Hi All,
I have been working with multiple developers on sharing project code using git. I found out that git is new to a lot of developers who have been using Visual Studio Team Foundation Server (TFS), Visual Studio Online (VSO aka VSTS now), or any other centralized source control system.
What is the difference between TFS/VSO/VSTS versus Git?
If you have been using TFS, VSTS or VSO, those all fall under Team foundation Version Control (TFVC) which is a centralized source control system.
While git, is a distributed source control system (DVCS). which means: you have a local and remote code repositories. you can commit your code to you local repo but not remote repo (unless you want to). Also, you can share your code to the remote repo so other team members can get these changes.
This is a fundamental concept to understand when working with git. git is distributed, contains local and remote repos & works offline and it is a great way to enable collaborations among developers.
**Popular git platforms: GitHub, VSTS, Bitbucket, GitLab, RhodeCode and others.
This article is focusing on managing multiple developers code working in a team & what is the git best practices around that, This also applies to any other git platform. For the sake of simplicity, This article will be focusing on using Git in VSTS.
Basic terminology and keywords to know when working with Git:
1) A branch: In Git, every developer should have his own branch. you write code and commit your changes into your local branch. To sync with other developers, get latest from the master branch and merge it into yours so you make sure everything is compiling & working before creating a new pull request to the master branch (by merging back your code into master).
2) Fetch: It download changes to your local branch from the remote branch. Fetch downloads these commits and adds them to the local repo without updating your local branch. To update your local branch either by executing merge or pull requests to your local repo to be up to date with its remote.
3) Pull: Get updates from your remote branch into your local branch. basically keeps your branch up to date with its remote one. Pull does a fetch and then a merge into your local branch.
So just use Pull to get your local branch updates from its remote one.
3) Pull vs Fetch: git pull does a git fetch. so if you used git pull this means that your have executed git fetch. you can execute fetch if you want to get the updates but do not want to merge them into yor local branch yet.
5) Push: sends committed changes to remote branch so it is shared with others.
Basic rules to work with git in Visual Studio that everyone should be aware of before start coding:
This section i cover all needed actions to work with using git in Visual Studio Team Explorer window.

1) You need to click on Sync in team explorer to refresh the current branch from the remote branch. followed by pull to get those changes merged into the current local branch. sync just show status but to actually merge those changes you need to click on pull link.
2) You need to click on Changes in team explorer every time you want to check in or get latest updates of the current branch.
3) You need to click on Branches in team explorer every time you want to manage branches in Visual Studio.
4) You need to click on Pull Requests in team explorer every time you want to manage pull requests in Visual Studio.
A) Setup a project for your team using Git in VSTS:
1) Visit http://visualstudio.com.
2) Login to your account.
3) Click on New button to create a new git project.
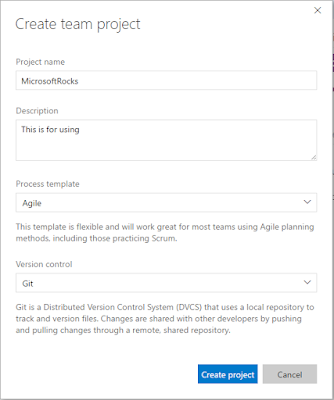
4) Once you hit create project button, the project will be created in few seconds and then we will use Visual Studio to do some necessary steps.
5) To start using Visual Studio with the created project, Click on Code tab for the newly created project "MicrosoftRocks".
6) Click on Clone in Visual Studio button.
7) This will open up VS and then open up Team Explorer window.
8) You need to click on "Clone this repository" this will allow you to create a local repo of the remote repo we have just created in VSTS.

9) Select a local repo folder and click on Clone.

10) Now, VS shows a message that we can create a new project or solution.

11) You can go ahead and create any project in VS, the only thing to notice to uncheck create a new Git repository checkbox when creating any new project since we have created already our local repo.

12) First things first, you need to exclude bin and debug folders from getting checked in Git. So, click on Settings in Team explorer -- > Click on Repository Settings link under Git --> Click on Add link to add .gitignore file.

13) To edit .gitignore file, click on edit link. Then, add the following at the bottom of the file:
# exclude bin and debug folders
bin
debug
14) Build the project and then we will do our first check in to the master branch.
15) Click on Home icon in team explorer to go back to the home page to manage source control options.
16) Click on Settings, Type a check in message and then click on Commit Staged.

17) Commit staged action has check in all our changes to our local repo, these changes have not been share to the remote, so we need to click on sync to share it with others.
You will notice, that VS shows you a sync link afterwards so you can sync changes immediately or your can click on Sync from team explorer and then click on Push.

18) Now, the project is ready in the master branch for everyone with git ignore file before everyone will create his own branch and start developing.
B) Create your own branch in Visual Studio:
1) Every developer in a team, should create his own branch and get the latest from master to start developing in our project.
2) From Visual Studio, Click on master branch from the bottom bar and click on new branch.

3) Enter your branch name "dev1" and from which branch your want to create yours "master" and then click on Create Branch button. This step will create your own branch and get latest from master and switch to your branch to start coding in it.
4) You will notice, the name of the current branch has changed from master to dev1 in Visual Studio. now you can start working in your branch.
5) Once you are done coding a feature or at a good point to check in some code, Follow these steps to check in your changes:
6) Publish your branch: It is important to publish your branch to VSTS, Follow these steps:

C) How to submit your code to the master branch:
1) First, you need to make sure that your local master branch is up to date. to do that, switch to master branch and click on sync and then click on pull in Team explorer window.
2) Second, Switch back to your branch "dev1" and then click on branches in team explorer.
3) Click on Merge link.
4) Select to merge from "master" into "dev1" and then click on Merge. This step will merge all master changes into your branch so your branch will get other people work and fix any conflict (if any) before submitting all changes to master using Pull Request (PR) action.

5) Now, we need to submit all these changes after making sure there are no conflicts to the master branch. Click on Pull Requests in Team explorer.
6) Click on New Pull Request link.

7) This will open Visual Studio online webpage to submit new pull request.
8) Click on New Pull Request button.
9) Submitted Pull Requests (PRs) will be either approved or rejected by the repository admins. unless you are an admin, you will be able to approve/reject and complete submitted PRs in any project and therefore these changes are committed/merged to the master branch.
10) Click on Complete button to complete the pull request. Visual Studio will prompt a popup window if you want to add any notes and then click on Complete merge button. This is the last step to merge your changes into master after your PR has been approved.

11) Repeat the same steps every time you want to merge your changes into master using PRs.
Hope this article has shown in detailed walk-though how to work in a team using Git in Visual Studio Team Services and manage your code checkins/checkouts/merge/branching and PRs in Git.
Enjoy!
-- ME
I have been working with multiple developers on sharing project code using git. I found out that git is new to a lot of developers who have been using Visual Studio Team Foundation Server (TFS), Visual Studio Online (VSO aka VSTS now), or any other centralized source control system.
What is the difference between TFS/VSO/VSTS versus Git?
If you have been using TFS, VSTS or VSO, those all fall under Team foundation Version Control (TFVC) which is a centralized source control system.
While git, is a distributed source control system (DVCS). which means: you have a local and remote code repositories. you can commit your code to you local repo but not remote repo (unless you want to). Also, you can share your code to the remote repo so other team members can get these changes.
This is a fundamental concept to understand when working with git. git is distributed, contains local and remote repos & works offline and it is a great way to enable collaborations among developers.
**Popular git platforms: GitHub, VSTS, Bitbucket, GitLab, RhodeCode and others.
This article is focusing on managing multiple developers code working in a team & what is the git best practices around that, This also applies to any other git platform. For the sake of simplicity, This article will be focusing on using Git in VSTS.
Basic terminology and keywords to know when working with Git:
1) A branch: In Git, every developer should have his own branch. you write code and commit your changes into your local branch. To sync with other developers, get latest from the master branch and merge it into yours so you make sure everything is compiling & working before creating a new pull request to the master branch (by merging back your code into master).
2) Fetch: It download changes to your local branch from the remote branch. Fetch downloads these commits and adds them to the local repo without updating your local branch. To update your local branch either by executing merge or pull requests to your local repo to be up to date with its remote.
3) Pull: Get updates from your remote branch into your local branch. basically keeps your branch up to date with its remote one. Pull does a fetch and then a merge into your local branch.
So just use Pull to get your local branch updates from its remote one.
3) Pull vs Fetch: git pull does a git fetch. so if you used git pull this means that your have executed git fetch. you can execute fetch if you want to get the updates but do not want to merge them into yor local branch yet.
5) Push: sends committed changes to remote branch so it is shared with others.
Basic rules to work with git in Visual Studio that everyone should be aware of before start coding:
This section i cover all needed actions to work with using git in Visual Studio Team Explorer window.

1) You need to click on Sync in team explorer to refresh the current branch from the remote branch. followed by pull to get those changes merged into the current local branch. sync just show status but to actually merge those changes you need to click on pull link.
2) You need to click on Changes in team explorer every time you want to check in or get latest updates of the current branch.
3) You need to click on Branches in team explorer every time you want to manage branches in Visual Studio.
4) You need to click on Pull Requests in team explorer every time you want to manage pull requests in Visual Studio.
A) Setup a project for your team using Git in VSTS:
2) Login to your account.
3) Click on New button to create a new git project.

4) Once you hit create project button, the project will be created in few seconds and then we will use Visual Studio to do some necessary steps.
5) To start using Visual Studio with the created project, Click on Code tab for the newly created project "MicrosoftRocks".
6) Click on Clone in Visual Studio button.
7) This will open up VS and then open up Team Explorer window.
8) You need to click on "Clone this repository" this will allow you to create a local repo of the remote repo we have just created in VSTS.

9) Select a local repo folder and click on Clone.

10) Now, VS shows a message that we can create a new project or solution.

11) You can go ahead and create any project in VS, the only thing to notice to uncheck create a new Git repository checkbox when creating any new project since we have created already our local repo.

12) First things first, you need to exclude bin and debug folders from getting checked in Git. So, click on Settings in Team explorer -- > Click on Repository Settings link under Git --> Click on Add link to add .gitignore file.

13) To edit .gitignore file, click on edit link. Then, add the following at the bottom of the file:
# exclude bin and debug folders
bin
debug
14) Build the project and then we will do our first check in to the master branch.
15) Click on Home icon in team explorer to go back to the home page to manage source control options.
16) Click on Settings, Type a check in message and then click on Commit Staged.

17) Commit staged action has check in all our changes to our local repo, these changes have not been share to the remote, so we need to click on sync to share it with others.
You will notice, that VS shows you a sync link afterwards so you can sync changes immediately or your can click on Sync from team explorer and then click on Push.

18) Now, the project is ready in the master branch for everyone with git ignore file before everyone will create his own branch and start developing.
B) Create your own branch in Visual Studio:
1) Every developer in a team, should create his own branch and get the latest from master to start developing in our project.
2) From Visual Studio, Click on master branch from the bottom bar and click on new branch.
3) Enter your branch name "dev1" and from which branch your want to create yours "master" and then click on Create Branch button. This step will create your own branch and get latest from master and switch to your branch to start coding in it.
4) You will notice, the name of the current branch has changed from master to dev1 in Visual Studio. now you can start working in your branch.
5) Once you are done coding a feature or at a good point to check in some code, Follow these steps to check in your changes:
- Click on Changes in team explorer, write a message and then click on Commit All button.
- You can also click on sync to push these changes to the remote branch in VSTS online.
- Remember, these changes are still in your branch no one else has seen it until you submit it to the master branch.
6) Publish your branch: It is important to publish your branch to VSTS, Follow these steps:
- From team explorer, click on branches.
- Right click on your branch.
- Click on Publish Branch.

C) How to submit your code to the master branch:
1) First, you need to make sure that your local master branch is up to date. to do that, switch to master branch and click on sync and then click on pull in Team explorer window.
2) Second, Switch back to your branch "dev1" and then click on branches in team explorer.
3) Click on Merge link.
4) Select to merge from "master" into "dev1" and then click on Merge. This step will merge all master changes into your branch so your branch will get other people work and fix any conflict (if any) before submitting all changes to master using Pull Request (PR) action.

5) Now, we need to submit all these changes after making sure there are no conflicts to the master branch. Click on Pull Requests in Team explorer.
6) Click on New Pull Request link.

7) This will open Visual Studio online webpage to submit new pull request.
8) Click on New Pull Request button.
9) Submitted Pull Requests (PRs) will be either approved or rejected by the repository admins. unless you are an admin, you will be able to approve/reject and complete submitted PRs in any project and therefore these changes are committed/merged to the master branch.
10) Click on Complete button to complete the pull request. Visual Studio will prompt a popup window if you want to add any notes and then click on Complete merge button. This is the last step to merge your changes into master after your PR has been approved.

11) Repeat the same steps every time you want to merge your changes into master using PRs.
Hope this article has shown in detailed walk-though how to work in a team using Git in Visual Studio Team Services and manage your code checkins/checkouts/merge/branching and PRs in Git.
Enjoy!
-- ME


